Controlling pod placement onto nodes in OpenShift
Publish Date: 2024-04-08 6 min read
Pod scheduling is the internal process that determines the placement of new pods onto nodes within the cluster. By default, the OpenShift scheduler does a genuinely good job on its own — but “good enough” isn’t always what you need.
In this article we’ll walk through the practical toolbox for controlling where your pods land: nodeSelector, node and pod affinity/anti-affinity, taints and tolerations, and topology spread constraints — with real use cases showing when a different choice leads to a completely different result, and when to reach for one tool over another.
nodeSelector for a simple “run here” rule, node affinity for richer required/preferred targeting, taints & tolerations to reserve nodes and repel everything else, pod affinity/anti-affinity to co-locate or separate workloads relative to each other, and topology spread constraints to distribute replicas evenly across zones and nodes for resilience.
First, how does the scheduler actually decide?
Before bending the scheduler to your will, it helps to know how it thinks. For every pod that has no node assigned yet, the scheduler runs two phases:
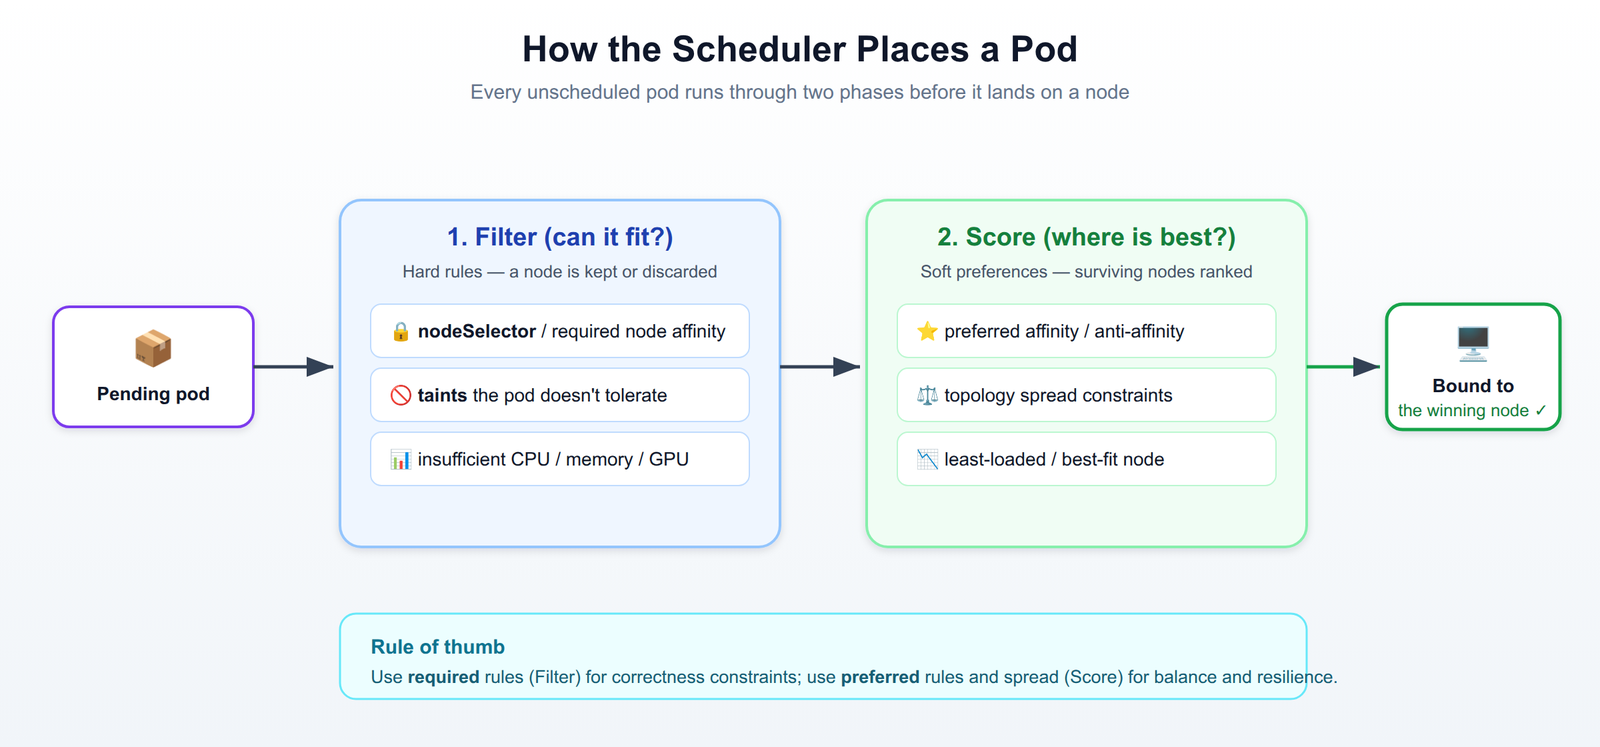
- Filter (predicates): hard, pass/fail checks. A node is either eligible or discarded — does it have enough CPU/memory, does the pod’s
nodeSelectormatch, does the pod tolerate the node’s taints? - Score (priorities): among the nodes that survived, each is ranked by soft preferences — preferred affinity, how evenly workloads are spread, how loaded the node already is — and the highest-scoring node wins.
Every mechanism below plugs into one of those two phases. Keep that mental model handy: required rules shape the Filter, preferred rules shape the Score.
1. nodeSelector — the simplest lever
The bluntest tool is nodeSelector: a pod will only be scheduled onto nodes carrying all of the labels you list. First, label the node:
oc label node worker-03.example.com disktype=ssdThen require that label in the pod (or, more realistically, in the Deployment’s pod template):
apiVersion: v1
kind: Pod
metadata:
  name: cache-pod
spec:
  nodeSelector:
    disktype: ssd
  containers:
    - name: redis
      image: redis:7
It’s perfect for “this workload needs SSD-backed nodes.” The catch: it’s all-or-nothing. If no node matches, the pod stays Pending forever — there is no “prefer, but fall back.” For anything more nuanced, reach for affinity.
2. Node affinity — required and preferred targeting
Node affinity is nodeSelector grown up: it supports operators (In, NotIn, Exists…) and, crucially, two flavours:
requiredDuringSchedulingIgnoredDuringExecution— a hard rule (Filter phase). No matching node, no scheduling.preferredDuringSchedulingIgnoredDuringExecution— a soft rule (Score phase) with aweight. The scheduler tries to honour it but will place the pod elsewhere rather than leave it pending.
spec:
  affinity:
    nodeAffinity:
      requiredDuringSchedulingIgnoredDuringExecution:
        nodeSelectorTerms:
          - matchExpressions:
              - key: topology.kubernetes.io/zone
                operator: In
                values: ["eu-west-1a", "eu-west-1b"]
      preferredDuringSchedulingIgnoredDuringExecution:
        - weight: 40
          preference:
            matchExpressions:
              - key: disktype
                operator: In
                values: ["ssd"]
This says: must run in one of two zones, and prefer SSD nodes when available. That “must + prefer” combination is exactly what nodeSelector can’t express.
3. Taints & tolerations — reserving nodes
Affinity and nodeSelector let a pod choose nodes. Taints flip the logic: they let a node repel pods. A tainted node refuses every pod that doesn’t explicitly tolerate the taint. This is how you reserve capacity — GPU boxes, licensed nodes, or infra nodes that shouldn’t run general workloads.
oc adm taint nodes gpu-node-01 gpu=true:NoScheduleNow only pods carrying the matching toleration can land there:
spec:
  tolerations:
    - key: "gpu"
      operator: "Equal"
      value: "true"
      effect: "NoSchedule"
The three effects are worth memorising: NoSchedule (don’t place new intolerant pods), PreferNoSchedule (avoid if possible), and NoExecute (also evict running pods that don’t tolerate it).
nodeSelector or node affinity (so it’s pulled toward them). One without the other is a classic misconfiguration.
4. Pod affinity & anti-affinity — placement relative to other pods
Sometimes placement depends not on the node’s labels but on what else is already running. Pod affinity co-locates pods; pod anti-affinity separates them. The topologyKey defines the boundary — same node, same zone, same rack.
The classic use case: spread the replicas of a web front-end so two never share a node, protecting you when a node fails.
spec:
  affinity:
    podAntiAffinity:
      requiredDuringSchedulingIgnoredDuringExecution:
        - labelSelector:
            matchLabels:
              app: web-frontend
          topologyKey: kubernetes.io/hostname
Conversely, podAffinity is how you keep a cache pod on the same node as the app that hammers it, shaving network latency. Powerful — but required pod anti-affinity across many replicas is computationally expensive and can leave pods pending, so prefer the preferred variant unless separation is truly mandatory.
5. Topology spread constraints — even distribution, cleanly
Pod anti-affinity answers “keep these apart,” but it’s clumsy at “spread these evenly.” Topology spread constraints were built for exactly that: they cap how imbalanced your pods can be across a topology domain via maxSkew.
spec:
  topologySpreadConstraints:
    - maxSkew: 1
      topologyKey: topology.kubernetes.io/zone
      whenUnsatisfiable: DoNotSchedule
      labelSelector:
        matchLabels:
          app: web-frontend
With maxSkew: 1 across zones, the scheduler keeps replica counts within one of each other — so three replicas across three zones land 1/1/1, not 3/0/0. Set whenUnsatisfiable to ScheduleAnyway to make it a preference rather than a hard rule.
Putting it together: a real placement strategy
Imagine a cluster with general worker nodes plus a few expensive GPU nodes, spread across three availability zones, and a mixed workload: a stateless API, a GPU-based inference service, and a Redis cache. A sound strategy layers the tools rather than picking just one:
- GPU nodes are tainted (
gpu=true:NoSchedule) so nothing lands there by accident. - The inference service carries the matching toleration and a
nodeSelectorforgpu=true— reserved and steered onto the GPU pool. - The stateless API uses a topology spread constraint (
maxSkew: 1across zones) so a single zone outage can never take out the whole service. - The Redis cache uses
preferredpod affinity to sit near the API, withnodeSelector: disktype=ssdfor fast persistence.
No single mechanism delivers that; the result comes from combining them deliberately.
Conclusion
OpenShift’s scheduler is smart, but it can only act on the intent you express. The mental model to carry away is simple: required rules (nodeSelector, required affinity, taints) shape which nodes are eligible; preferred rules and spread constraints shape which eligible node is best. Start with the least restrictive tool that solves your problem, reach for hard rules only when correctness demands it, and always double-check that a “must run here” intent is actually backed by both a repel (taint) and a pull (selector/affinity) where needed.
Working through a tricky scheduling setup, or want a second pair of eyes on a placement strategy? Feel free to get in touch.
0 Comments
No comments yet. Be the first to share your thoughts!